こんにちは、@Manabu です。
WordPressでブログやサイトを運営していると、「もう少しこうだったらいいのに」と思うことはありませんか?
ウィジェットでおすすめの記事を紹介できたらな〜
私は、以前からこのように感じました。
カスタムウィジェットを作成すると、自分のサイトにピッタリな機能を簡単に追加することができます。
私の理想のブログに近づけるため、オリジナルのカスタムウィジェットを作成し、おすすめの記事を表示できるように対応しました。
この記事は、以下のような方におすすめです。
ぜひ参考にしてください。
WordPressウィジェットとは?
WordPressのウィジェットは、サイドバーやフッターといった固定の場所に簡単に追加できる小さな機能ブロックです。
例えば、「人気記事」「プロフィール」「アーカイブ」「タグクラウド」などが提供されています。
ウィジェットを使うことで、サイトのレイアウトを自由にカスタマイズでき、サイトの閲覧者にとって使いやすいサイトを作ることができます。
WordPressの場合、「外観」ー「ウィジェット」で設定できます。
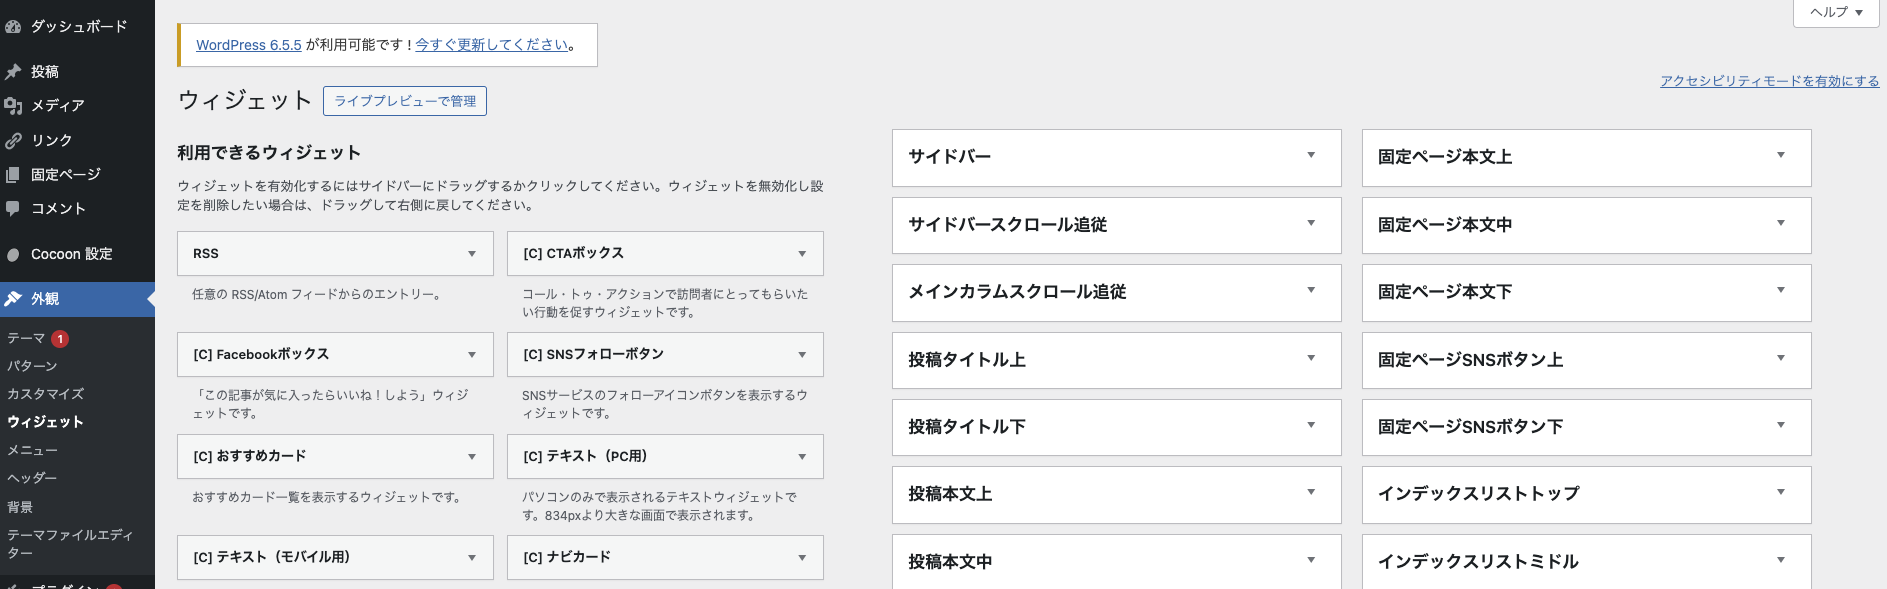
左側の利用できるウィジェットに関しては、簡単に右側の「サイドバー」に設定できます。
今回は、こちらにオリジナルのウィジェットを作成します。
カスタムウィジェットの登録
今回は、それぞれの記事に設定される「post_id」を指定して、好きな記事を表示するウィジェットを作成します。
カスタムウィジェットは、テーマのfunctions.phpにソースを書き込むことで、登録・追加することができます。
以下のソースをfunctions.phpに記載します。
// ウィジェットの登録
function recommendation_posts_widget() {
  register_widget('Recommendation_Posts_Widget');
}
add_action('widgets_init', 'recommendation_posts_widget');

// ウィジェットクラスの定義
class Recommendation_Posts_Widget extends WP_Widget {

  public function __construct() {
    $widget_ops = array(
      'classname' => 'recommendation_posts_widget',
      'description' => '指定した記事を表示するカスタムウィジェット',
    );
    parent::__construct('recommendation_posts_widget', 'カスタムウィジェット', $widget_ops);
  }

  // 画面の表示に関して
  public function widget($args, $instance) {
    echo $args['before_widget'];
    if (!empty($instance['title'])) {
      echo $args['before_title'] . apply_filters('widget_title', $instance['title']) . $args['after_title'];
    }

    // 記事IDのリストを取得
    $post_ids = !empty($instance['post_ids']) ? explode(',', $instance['post_ids']) : array();
    $display_setting = !empty($instance['display_setting']) ? $instance['display_setting'] : 'list';

    $query_args = array(
      'post__in' => $post_ids,
      'orderby' => 'post__in',
      'ignore_sticky_posts' => 1,
    );

    $custom_query = new WP_Query($query_args);

    if ($custom_query->have_posts()) {
      if ($display_setting == 'grid') {
        echo '<div class="custom-widget-grid">';
        while ($custom_query->have_posts()) {
          $custom_query->the_post();
          echo '<div class="custom-widget-grid-item">';
          echo '<a href="' . get_permalink() . '">' . get_the_title() . '</a>';
          echo '</div>';
        }
        echo '</div>';
      } else {
        echo '<ul>';
        while ($custom_query->have_posts()) {
          $custom_query->the_post();
          echo '<li><a href="' . get_permalink() . '">' . get_the_title() . '</a></li>';
        }
        echo '</ul>';
      }
    }
    wp_reset_postdata();
    echo $args['after_widget'];
  }

  // ウィジェットの入力フォーム
  public function form($instance) {
    $title = !empty($instance['title']) ? $instance['title'] : '';
    $post_ids = !empty($instance['post_ids']) ? $instance['post_ids'] : '';
    $display_setting = !empty($instance['display_setting']) ? $instance['display_setting'] : 'list';
    ?>
    <p>
      <label for="<?php echo $this->get_field_id('title'); ?>">タイトル:</label>
      <input class="widefat" id="<?php echo $this->get_field_id('title'); ?>" name="<?php echo $this->get_field_name('title'); ?>" type="text" value="<?php echo esc_attr($title); ?>">
    </p>
    <p>
      <label for="<?php echo $this->get_field_id('post_ids'); ?>">記事ID(カンマ区切り):</label>
      <input class="widefat" id="<?php echo $this->get_field_id('post_ids'); ?>" name="<?php echo $this->get_field_name('post_ids'); ?>" type="text" value="<?php echo esc_attr($post_ids); ?>">
    </p>
    <?php
  }

  // 入力フォームの設定保存
  public function update($new_instance, $old_instance) {
    $instance = array();
    $instance['title'] = (!empty($new_instance['title'])) ? strip_tags($new_instance['title']) : '';
    $instance['post_ids'] = (!empty($new_instance['post_ids'])) ? strip_tags($new_instance['post_ids']) : '';
    return $instance;
  }
}
何をしているのか簡単に説明すると、以下のようなイメージです。
・ウィジェットクラス:WP_Widgetクラスを継承して、カスタムウィジェットを定義
・widgetメソッド:サイト画面に表示される形を指定
・formメソッド:管理画面の設定フォームを作成
・updateメソッド:formの入力値を更新する処理を作成
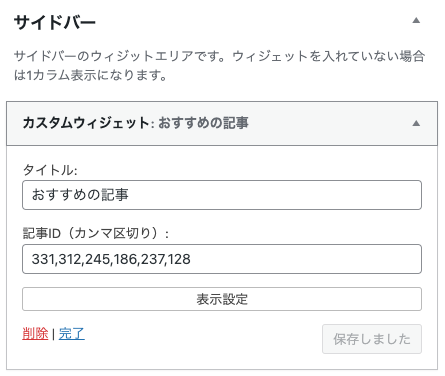
functions.phpに上記のソースを追加すると、以下のように画面に表示されます。
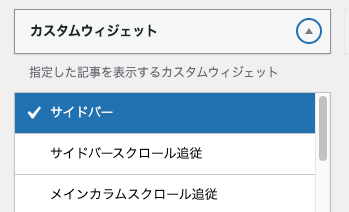
サイドバーに追加すると、設定フォームが表示されます。
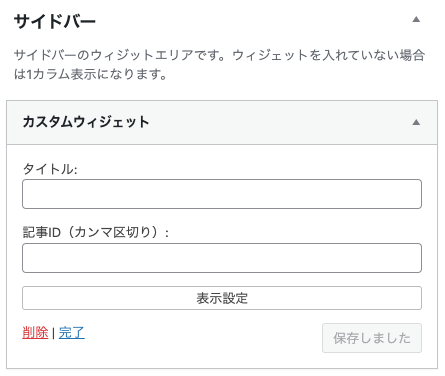
「タイトル」にウィジェットの題名、「記事ID」に表示させたい記事のID(post_id)をカンマ区切りで入力し、保存ボタンをクリックします。
サイトの画面上で確認すると、タイトルと記事一覧がサイドバーに追加されました。
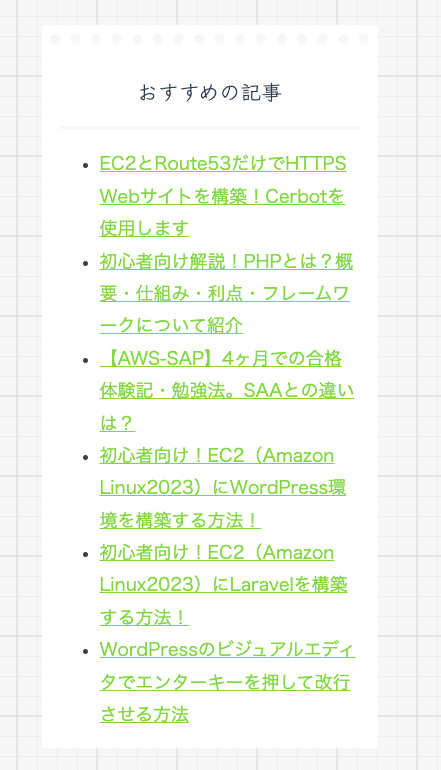
文字列のみの表示になっているため、変更したい方はwidgetメソッドを好きな形に改修するようにお願いします。
私は、画像のみの表示にするために以下のように設定しています。
public function widget($args, $instance) {
  echo $args['before_widget'];
  if (!empty($instance['title'])) {
    echo $args['before_title'] . apply_filters('widget_title', $instance['title']) . $args['after_title'];
  }
  // 記事IDのリストを取得
  $post_ids = !empty($instance['post_ids']) ? explode(',', $instance['post_ids']) : array();

  $query_args = array(
    'post__in' => $post_ids,
    'orderby' => 'post__in',
    'ignore_sticky_posts' => 1,
  );

  $custom_query = new WP_Query($query_args);

  if ($custom_query->have_posts()) {
    while ($custom_query->have_posts()) {
      $custom_query->the_post();
      $post_thumbnail = get_the_post_thumbnail_url(get_the_ID(), 'thumb320');

      echo '<a href="' . esc_url(get_permalink()) . '" class="popular-entry-card-link widget-entry-card-link a-wrap no-4" title="' . esc_attr($post_title) . '">';
      echo ' <div class="post-' . esc_attr($post_id) . ' popular-entry-card widget-entry-card e-card cf post type-post status-publish format-standard has-post-thumbnail hentry">';
      echo ' <figure class="popular-entry-card-thumb widget-entry-card-thumb card-thumb">';
      echo ' <img width="320" height="180" src="' . esc_url($post_thumbnail) . '" class="attachment-thumb320 size-thumb320 wp-post-image" alt="" decoding="async" loading="lazy">';
      echo ' </figure>';
      echo ' </div>';
      echo '</a>';
    }
  }
  wp_reset_postdata();
  echo $args['after_widget'];
}
今、サイドバーに表示されている「おすすめの記事」はこちらを使用しています。
まとめ
今回はカスタムウィジェットを作成し、おすすめの記事をウィジェットで表示させる方法について紹介しました。
WordPress自体やテーマでカスタムできる以外の部分については、自分で機能を追加する必要があります。
少しずつでも慣れるために、自分の望む機能があれば挑戦していくのが良いかもしれません。